Pages

Showing posts with label Stampede. Show all posts

Friday, July 20, 2012

Xpower Stampede Kit - Review & Installation Guide!

Check out the Xpower Stampede Kit from Xplorer!

Xplorer is a company in Singapore that designs and produces ready-made aftermarket performance parts and kits for Nerf blasters.

The Xpower Stampede Kit upgrades the stock Stampede breech system to an improved breech design that enables more efficient air flow from the plunger to the barrel, hence generating more power and longer ranges.

The parts in this kit are individually CNC machined from a multi-axis milling machine and further hand finished to ensure high quality and fitment.

:: Overview ::

This kit comprises of just 2 main parts, the Xpower receiver piece (with attached copper barrel) and the Xpower bolt tip piece.


The included copper barrel is 12cm (approx 4.7") in length and designed specifically to fit stefans (custom foam darts), the dart fit is similar to 9/16" K&S brass barrels or 0.528" ID PETG barrels.

The Xpower system works by utilizing a funnel design in the receiver. When chambering a foam dart, the bolt is guided into the receiver funnel as it moves forward and pushes the foam dart securely into the barrel, then the Stampede fires and the bolt retracts back. This completes one firing cycle.

In the photo below, you can see the funnel design in the Xpower receiver.


In order to connect into the funneled receiver, a matching Xpower bolt tip piece will be installed on the existing bolt to enable this system to work.


Note that the Xpower Stampede breech is designed for short-length stefans (up to 3.5cm length), this is to ensure high performance, consistency and accuracy.

This kit is designed to be very simple to install and can be done by anyone with basic modding skills.


:: Installation Guide ::

For the system to work optimally, ensure that the Stampede is already modded with the various basic AR removal, aftermarket spring and voltage increase mods beforehand, as shown in my Nerf Stampede Mod Guide.


Proceed to remove all the original parts and mechanisms from the front of the blaster.


Step 1: Start with the receiver section.

Slot the Xpower receiver and copper barrel into the original orange plastic barrel, use some electrical or duct tape to wrap a few ring layers around the copper barrel so that it sits properly within it. Install the 3 machine screws to secure it to the casing.


The receiver section is done!


Step 2: On to the bolt section.

Take the original orange plastic bolt and draw guide lines across the front part of the bolt tip, note where the dotted guide lines are drawn in the photo below.
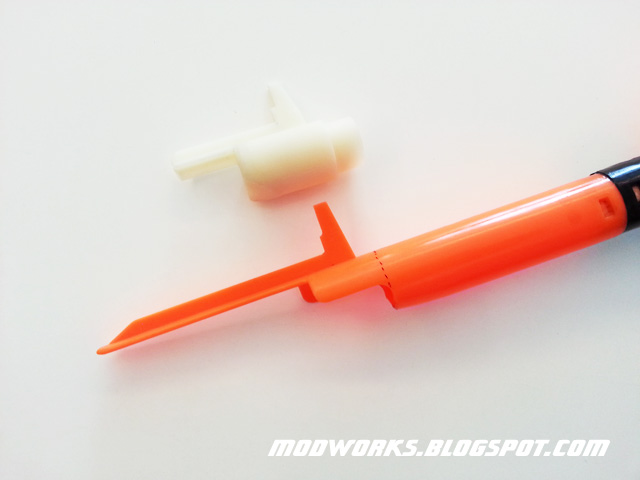

Also draw a guide line at the top of the bolt to indicate the bolt tip alignment.


Use a Dremel with a cutting wheel and sanding bit (or other suitable cutting tool) to cut the bolt tip at the guide lines. Make sure the cut is clean and sanded smooth.


Glue the Xpower bolt tip to the original bolt. Ensure that it is aligned accurately. Use high strength glue to ensure a durable bond.


The bolt section is done!


Step 3: Install all the parts into the Stampede.

Test the bolt movement to ensure that the Xpower bolt tip chambers into the Xpower receiver smoothly and is also able to retract back automatically on its own without resistance.


After everything is assembled. This is what the Xpower Stampede breech will look like.


The Xpower Stampede Kit works with both the Xpower 12-dart Stefan Clips (Version 2 Only) and Converted N-Strike 18-dart Stefan Clips.


:: Demo & Test Fire ::

In this demo & test fire of the installed Xpower Stampede Kit, i am using a combination of 9kg load spring with 16.8V power:


Note that the Stampede's range and rate-of-fire will vary depending on the spring load and power source/voltage. Users can customize it to their own preference.


:: Comparison Tests & Modding Tips ::

Many modders have been asking about the difference between the Brass breech and Xpower breech for the Stampede.

Here is a comparison test video that demonstrates the performance difference between both breech designs, based on equivalent spring loads and optimization mods done:


Note that this comparison test is not meant to establish which design is better, its just a process to understand their differences and how to optimize them. There are pros and cons to both designs (beyond just range distance), so its up to users to determine the most suitable design for their usage.

The variation in their ranges are due to the characteristics of their different breech designs.

The brass breech design is more complex and requires skill to build and tune but when built well it features a full air seal, while the funnel design of the Xpower breech is simpler and much easier to install, but sometimes there may still be tiny gaps in the seal, hence resulting in slightly shorter ranges at equivalent spring loads (each setup is different due to parts variations, so it may just need further fine-tuning to get a full air seal).


:: Summary ::

Overall, the Xpower Stampede kit is an ideal aftermarket performance enhancement for modders who are looking for high quality ready-made parts. It saves alot of modding time and requires minimal installation work.

For non-modders, this kit grants instant improvement to their blasters without the need to spend hours modding and tuning. Xplorer also offers their customers installation services for the blaster kits too (subject to their technical staff manpower availability).

With the right spring load and setup, the Xplorer Stampede kit offers users excellent modded performance and greatly enhances the effectiveness of their Stampedes. :)


To order the Xpower Stampede Kit: Xplorer Web Store

To participate in Xpower discussions: Xplorer Facebook Group


Wednesday, January 25, 2012

Nerf Stampede "Brass Breech" Mod Guide!

This mod guide will look into my "Brass Breech" modification for the Nerf Stampede.

Introduction:

The stock stampede plastic breech does not have an air-tight bolt to barrel seal, hence the plastic bolt itself is essentially the barrel. Once the foam dart is fired out the bolt, the foam dart already starts losing power and velocity. In addition, most of the air pressure from the plunger is wasted once the foam dart leaves the bolt.

The design objective of an air-tight brass breech system is to create a 100% air-tight seal all the way from the plunger through to the barrel, thereby providing efficient air pressure delivery to propel the foam darts further.

This would result in more power within each shot, with greater firing distance and faster dart velocity.

For a Stampede brass breech to work, it requires the air-tight connection of matching brass tubes and a guide cover to ensure that all the moving parts are aligned properly.

My design is optimized to work with stefans (short length customized foam darts), although it could be adapted to use normal length foam darts, they usually wouldn't perform as accurately or consistently, and may result in much higher rates of jams.

The following guide will cover my customized version of the "Brass Breech" mod.

Credits:

My brass breech design for the Stampede is based on the excellent "PVC guide cover" design by Oxymoron at the OzNerf forum, full credit goes to him for that design.

Link to the original "Oxy's Stampede Breech" thread by Oxymoron at the OzNerf forum.

Important Note:

The "Brass Breech" mod is a more advanced mod project that should only be performed by those who are already familiar with modding the Stampede.

For new modders, please refer to my Nerf Stampede Mod Guide to get familiar with the modding basics first.

Disclaimer: Modify at your own risk. Modifications may wear out or damage your blaster. Please be careful when using hobby tools!

Lets start...

Step 1: You will need to obtain 3 different sizes of brass tubes (Brand: K&S Engineering) and a suitable PVC pipe for nesting them into.


The brass tube sizes are: 1/2", 17/32" and 9/16". All of them are 0.014" wall thickness. They are usually supplied at hobby shops in either 1 ft or 3 ft length tubes.

I use a 13mm SingaPlastics brand PVC pipe which can nest the 9/16" brass tube. This pipe will be used to create the PVC guide cover.

Note that the inner diameters (ID) of PVC pipes often tend to have variations, even within the same length of pipe, so you have to test different sections and make sure it fits the brass tubes before usage.

Its recommended to prepare and polish the brass tubes with some metal polish to remove any oxidization that may have occurred both externally and inside the tubes, this helps smoothen out the surfaces for lower friction and better fit.


As you can see, the brass tubes nest perfectly within each other and they all form an instant 100% air-tight seal. Those who have worked with brass breech systems will be very familiar with this unique characteristic. :)


Step 2:

Lets start with the PVC guide cover, this is the most essential part of the Stampede brass breech system. The guide cover ensures that the moving brass bolt chambers each foam dart into the barrel properly and consistently.

Take the PVC pipe and mount the N-Strike clip on it.


Use a marker to trace the outline of the clip's shape.


Use a Dremel with cut-off wheel to cut out the traced lines.


As the top section of the guide cover ends up being a rather thin strip of PVC (which will tend to flex too much), i cut out another shaped part from a larger 16mm SingaPlastics brand PVC pipe which is then glued on the top to further reinforce and stiffen that section.


The PVC guide cover is done!


Step 3:

Now we proceed on to the brass barrel section.

In my example, i use a 21 cm length (8+ inch) of 9/16" brass tube as the barrel. It is nested and glued into the PVC guide cover.


Use a Dremel with sanding bit to bevel the inner edges of the brass barrel, this creates a funnel design to enable smoother chambering of the foam darts and brass bolt.


I positioned the barrel and guide cover assembly to align with the internal dimensions of the Stampede, an additional PVC pipe was nested at the front of the barrel to help keep it in line with the Stampede's front casing structure piece.

The orange collar piece is also positioned and glued to the PVC guide cover to establish a fixed securing point to the blaster casing.


The brass barrel section is done!


Step 4:

Next we proceed to the brass bolt section.

Use a pipe cutter to cut away the stock plastic bolt, as shown in this photo.


To make the brass bolt parts, use a Dremel to separately cut out a set of brass tube sections in the following lengths:

1/2" brass tube: 11 cm
17/32" brass tube: 2 cm (2 x spacer sections)
9/16" brass tube : 9 cm

These are my custom tube measurements for the Stampede brass breech system.

These measurements need to be as accurate as possible. Any variations may affect the overall structure and air seal of the breech system.


Used a Dremel with sanding bit to bevel the outer edges of the brass bolt front section, this will help to further enable smoother chambering of the foam darts and brass bolt into the brass barrel.

Here is my Nested Brass Tubes Cut-Away Diagram:


Nest the assembled brass bolt into the plunger casing.

Use the strongest glue you can get to glue everything together. I use "Selleys Super Strength" 2-part slow-curing epoxy glue (curing time of 3 days!). Make sure the glue cures completely for maximum bond strength.


Note that the 1/2" brass tube acts as the air channel and helps to reduce dead space, but not too much to create an air restriction.

The 17/32" brass tube will chamber the foam dart and connect into the 9/16" brass barrel, this is what creates the 100% air seal.

The brass bolt section is done!


Step 5:

Sleeve the brass bolt into the PVC guide cover. Test the parts movement and connection with the brass barrel.


The brass bolt must be able to move smoothly within the PVC guide cover without resistance.

If there is resistance, use a Dremel with sanding bit to widen the inner diameter (ID) of the PVC guide cover until it fits.

When the 17/32" brass bolt connects into the 9/16" brass barrel, it should have a 100% air-tight seal. Test the seal by closing the breech, then manually compressing the plunger while blocking the barrel exit, there should be resistance felt in the plunger rod.

Next, install all the parts into the Stampede.


Test the parts fit and test the movement of the brass bolt. Make sure everything moves smoothly.

If there are parts which encounter resistance, either loosen or trim the fit and test again.


Assemble everything together, keep testing the movement of the parts as you assemble the blaster.


Its completed!

Here are some close-ups of the breech system:


Awesome!

Stampede Brass Breech - Demo & Test Fire Video:


Sample Test Fire Results:

PTG: Parallel-To-Ground (Shoulder height, no elevation)
ATG: Angled-To-Ground (Aimed higher, 30 degrees elevation)

Distance is measured at where the dart lands (Average of 6 darts).

Brass Breech Stampede (9kg Load Spring)
Ammo: Customized FBR foam + 1.1 gram soft silicone tip weight
PTG = 95-105 ft
ATG = 120-130 ft

Note that the test was done indoors with customized foam darts and the results are sample estimates for reference (your results may differ depending on materials and mod techniques used).


Important User Tips:

- Short length customized stefans work best with this breech system, make sure that the stefans used are in perfect condition and fit the brass barrel properly (not too narrow or not too wide). In addition, ensure that the back portions of the stefans are rounded without any excess foam sticking out which might get clipped by the brass breech when it closes. Taking care of these various factors will greatly reduce the chances of jamming.

- With the clip and trigger locks removed, do not put your fingers into the breech section when the blaster is in operation, as this can result in injuries.

- The better the foam dart fit in the brass barrel, the better the range results.


Variants:

For fans of minimized Stampedes... check out the brass breech mod done on my "SMG" Variant!


Note the extra length of PVC pipe and coupler covering the brass barrel in front, it is designed to cover the brass tube edges for safety in Nerf games. :)

Check it out in action!


Wednesday, June 15, 2011

Nerf Stampede "SMG" Conversion!

Minimized Stampede... my "SMG" version! :)


Gaps covered by assorted bits and pieces from chopped out parts (guess which parts the bits came from?).


Retained shoulder stock.


Relocated battery pack. It houses 4 x fully charged 14500-size TrustFire Li-Ion rechargeable batteries (unprotected versions) which output a total of 16.8V.


And this is what i call... the "SpamFire" Combo! :)


Check it out in action!


Tuesday, September 21, 2010

Nerf Stampede - Plunger Catch Control Spring Troubleshoot!

Credit goes to Spartan at the NerfSG forum for detecting and solving this issue.

Some users who have modded their Nerf Stampedes may have encountered an odd issue whereby their blasters continue firing even after they release the trigger, resulting in erratic firing operation... or the bolt moving to and fro but the catch not releasing at all.

Here is a possible cause of this phenomenon:


The Stampede's Plunger Catch Control Spring has somehow popped out of position and no longer functions properly.

The solution is to remove the catch control component and reposition the spring back to its original position, then install it back into the Stampede.


Applying some tape to cover the gaps can also help prevent the spring from popping out again too.

This should help solve the Stampede's "auto-running" or erratic firing issues... or at least narrow down the causes. :)

Saturday, September 18, 2010

Nerf Stampede - Battery Sled "Quick-Release Catch" Mod!

Ever wished you could do away with using a precision screwdriver every time the Stampede's battery sled needs to be opened?

Especially for those of us modders who use higher voltage but lower capacity Li-Ion rechargeable batteries and need to frequently access the battery sled.

Here is an excellent functional mod from fellow Nerf enthusiast and modder irfanzain... the Nerf Stampede battery sled "Quick-Release Catch" Mod!

Check out his forum threads on this modification at NerfSG and NerfHaven. Full credits got to irfanzain for his simple yet efficient idea and design! :)

Here is an example of a set of quick-release catches that i've installed on one of my modded Nerf Stampedes:

Nerf Stampede - Battery Sled "Quick-Release Catch" Mod


Quick-release catches can be sourced from most major hardware stores and shops.

Yeah, i'm definitely installing quick-release catches on all my modded Stampedes!

Wednesday, September 15, 2010

More Blaster Protection Cases!

As readers may have seen in my earlier post on Blaster Protection Cases which could fit blasters like Longshots or +bows... they worked well, but that version was just slightly too small for the Nerf Stampede.

Good News! I've managed to get larger protection cases that can fit the Nerf Stampede!


Yeah... Stampede players can now arrive in pro-style too!

Friday, September 10, 2010

Nerf Stampede Mod Guide!

This Mod Guide will cover some performance mods for the Nerf Stampede.

Mods covered:
- Air Restrictor (AR) Removal
- Plunger Rod Air Release Seal
- Plunger Padding
- O-Ring Replacement
- Voltage Increase
- Aftermarket Spring Replacement

Disclaimer: Modify at your own risk. Modifications may wear out or damage your blaster. Please be careful when using hobby tools!


:: AR Removal ::

Step 1: Disassemble your Stampede. Make sure to remove all the screws before detaching the casing.


Step 2: Disassemble the plunger mechanism components and remove the plunger rod from the plunger casing.


Step 3: Use long screwdrivers and a hammer, carefully knock out the Air Restrictor (AR) assembly from both ends of the plunger and bolt.


Left Photo: Stock Air Restrictor / Right Photo: Air Restrictor Removed.


:: Plunger Rod Air Release Seal ::

Look at the front and back of the plunger tip, notice the 2 air release holes?
For a better air seal, use super glue or epoxy glue to seal both of them.


:: Plunger Padding ::

Without the AR, there is no air buffering system to cushion the plunger on bolt impact.

This results in very high wear and tear on the plunger and bolt casing, by both normal firing and dry firing. Due to repeated direct impacts on the bolt (hence the loud cracking sound during firing) over time, the bolt and plunger may become damaged.

Therefore, padding should be applied to the plunger to help cushion the impact.

In the following photo, i attached a 20mm diameter soft bumper padding to the tip of the plunger.


The 20mm diameter soft bumper pads i used in the above example are from a brand called "Volkmar-Fix", they can be found at most common hardware shops.


:: O-Ring Replacement ::

To test the plunger air seal, block the bolt exit and try to push the plunger rod into the plunger casing, if the air seal is optimized, there should be some resistance in the plunger. It should still be able to move smoothly when the bolt exit is not blocked.

If the plunger seal is loose, simply replace the stock o-ring with a more air-tight aftermarket o-ring.

From my experience, the plungers in different Stampede units can differ slightly in diameter, therefore you will have to test various o-rings to find the ideal ones that fit properly for an air-tight seal.

Photo Left: Aftermarket O-Ring / Photo Right: Stock O-Ring


:: Voltage Increase ::

The voltage feed to the Stampede's motor determines its speed and torque.

To increase the Stampede's Rate of Fire (RoF), simply increase the amount of voltage to its motor.

In my examples, i choose to use 14500 size 3.7V Li-Ion Rechargeable Batteries (Brand: TrustFire / Unprotected versions) for all modded Stampedes.

I prefer to use these type of battery sizes due to their versatility in usage. Because of their AA compatible size, they can fit into multi-slot AA battery holders, and are not just limited to specific hobby or modding usage, they can also be used other devices like CREE torch lights or even to replace normal batteries in compact electronics devices (with proper voltage matching).

Such batteries can be installed in the original Stampede battery sled without additional modification, simply use AA or 2AA to D-battery converters, or use multi-slot AA battery holders.


14500 size 3.7V TrustFire unprotected Li-Ion rechargeable batteries can be charged up to 4.2V each, so i use 4 of them in a 4AA battery holder to get around 16.8V of power.


Notice how little space these rechargeable batteries require. :)

These 14500 size Li-Ion rechargeable batteries are compact and lightweight. Although their 900mAh capacity are low compared to other batteries, i've tested sets at full charge and have managed to fire around 40 x 18-dart clips worth of foam darts before the battery sets require recharging.

That's more than 700+ shots per charge, more than enough for most Nerf games.

As a reserve, i usually just carry an extra spare set for extended Nerf games or when the first set is recharging.


:: Aftermarket Spring Replacement ::

One way to increase the speed of air delivery through the bolt is to replace the stock spring with a stronger aftermarket spring.

There are many different springs with different sizes and spring force ratings. Spring choice will depend on your usage.

The examples below show the stock spring compared with 3 other aftermarket springs.

Photo (Left-Right): Stock Spring, 6kg load Spring, 9kg load Spring, 13kg load Spring.


Tested effects and usage of the various aftermarket springs shown above:
6kg load Spring
- Works with 9V but RoF will be reduced by 50%, recommend >12V for better RoF.

9kg load Spring- 9V has difficulty moving the plunger, 12V gets normal RoF, recommend >15V for better RoF.
13kg load Spring - 12V has difficulty moving the plunger, 15V gets normal RoF, recommend >18V for better RoF.

Note that the above voltages are tested with TrustFire 14500 unprotected Li-Ion rechargeable batteries. These unprotected Li-Ion batteries have high discharge rates which are necessary to provide the required torque to the motor to handle heavier spring loads.

Be advised that protected versions or regular Alkaline batteries may not have high enough discharge rates (separate factor from voltage) to enable the motor to pull such heavier spring loads.

For an optimal balance of RoF, range and reliability, i currently use 9kg load aftermarket springs with 16.8V power on my modded Stampedes.

Photo Top: Stock Spring / Photo Bottom: 9kg load Spring


:: Modified Nerf Stampede - Test Fire & Range Testing Video ::

All the above modifications will result in this...


:: Sample Test Fire Data ::

PTG: Parallel-To-Ground (Shoulder height, no elevation)
ATG: Angled-To-Ground (Aimed higher, 30 degrees elevation)

Distance is measured at where the dart lands (Average of 6 darts).

Stock Stampede
PTG = 20 ft
ATG = 30 ft

Modded Stampede (AR Removal & 6kg Load Aftermarket Spring)
PTG = 45 ft
ATG = 60 ft

Modded Stampede (AR Removal & 9kg Load Aftermarket Spring)
PTG = 60 ft
ATG = 75 ft

Modded Stampede (AR Removal & 13kg Load Aftermarket Spring)
PTG = 70 ft
ATG = 85 ft

Note that the tests were done under controlled conditions with customized foam darts. The results are sample estimates for reference (your results may differ depending on materials and mod techniques used).