Looking for some protection from foam darts?
Make your own Foam Ballistic Shield!
Foam ballistic shields can introduce more interesting tactics in nerf skirmish games, especially for indoor close-quarter-battle (CQB) games!
I've seen some shield examples online made with metal panels, wood planks or acrylic sheets, but those materials are abit too heavy to carry around and require a fair amount of craft work and tools.
My idea was to have something that is portable, light-weight, durable and easy to make... and looks cool too.
Here is how i made my foam ballistic shields with very simple materials in just 5 minutes:
Step 1: Get a car boot foam tray from your local car accessory shop. Preferably rectangular, with raised edges and in 3 feet x 2 feet dimensions.
Step 2: Cut out a suitable sized view slot (can also attach a piece of clear transparency sheet to cover the view slot).
Cut the excess foam piece into 2 strips (to use as handles).
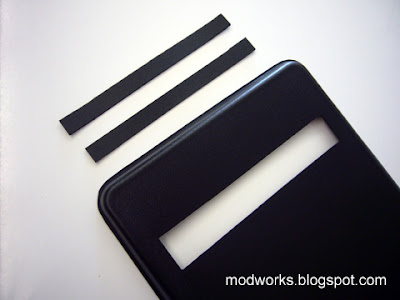
Step 3: Attach the 2 strips as handles onto the back of the foam ballistic shield using velcro (so that its adjustable for multiple users).
Final Step: Print out your favourite logo or call sign and attach it to the front of the foam ballistic shield.
A Nerf Maverick would seem to be the natural choice for nerf players equipped with a foam ballistic shield... but do note that the Nerf Maverick is a manual-action single-shot blaster.
Due to having one arm already holding the foam ballistic shield, it would be more effective to equip a semi-auto/full-auto blaster like the Nerf Magstrike or Rapid Fire 20.
On the flipside, this may also make shield equipped players abit too "overpowered" in nerf games, therefore expect organizers to set additional special rules to balance the usage of foam ballistic shields.
Anyways... when you are not using it as a foam ballistic shield for your nerf games, you could still use it as a foam tray for your car boot! :)
Sunday, May 17, 2009
Friday, May 1, 2009
Buzz Bee Belt Blaster Mod - Ammo Belt Drum!
The Buzz Bee Belt Blaster is an interesting foam dart blaster with its pump-action design and 30-dart ammo belt.
But the common method of connecting it into a loop and letting the belt dangle freely while firing can be abit too obstructive and looks messy, especially when playing fast paced skirmish games that involve quick fire and movement.
Therefore, i created a custom Ammo Belt Drum for the Belt Blaster, something to keep the ammo belt secured in a container yet allowing it to cycle freely (and still look cool at the same time!).
Here is how i made my custom Ammo Belt Drum:
Step 1: Get a CD Spindle Case (8cm tall) and Velcro Strips with adhesive backings.
Step 2: Cut a hatch into the CD spindle case cover, the hatch width should ideally be 4-5 cm wide. Make sure the right side of the hatch (shown in the photo below) is left attached to the cover, this will be the hatch ramp. Also cut out the CD spindle.
Step 3: Position the ammo belt in the drum (as shown below).
It should look like this.
Step 4: Stick the Velcro Strips to the Belt Blaster and Ammo Belt Drum.
Step 5: Attach the Ammo Belt Drum to the Belt Blaster.
Note how i wrapped the Ammo Belt over the top of the Belt Blaster's belt rotator cover.
Final Step: Locked n' loaded... Ready to deploy!
Ammo Belt Drum - Test Fire Video
Labels:
Belt Blaster,
Buzz Bee,
mod
Subscribe to:
Posts (Atom)