Pages

Saturday, July 28, 2012

Nerf N-Strike Elite Retaliator - Mod Guide!

This Mod Guide will cover performance mods for the Nerf Retaliator.

Mods covered:
- Air Restrictor (AR) Removal
- Spring Replacement
- Locks Removal

Note: These mods are also applicable to the Nerf Rampage as they both share similar internal bolt and plunger mechanisms.

Disclaimer: Modify at your own risk. Modifications may wear out or damage your blaster. Please be careful when using hobby tools!


:: AR Removal ::

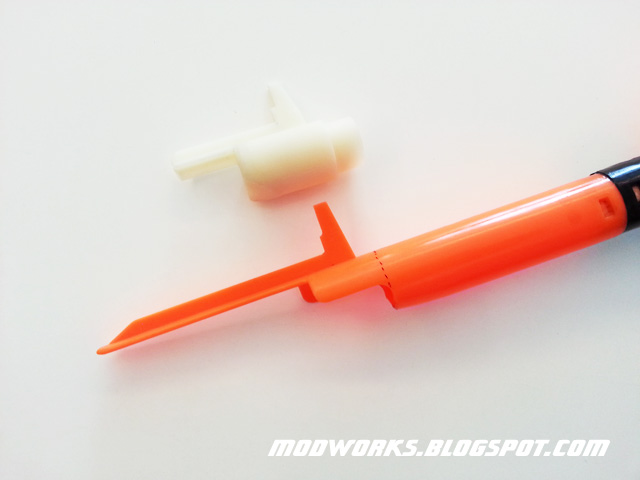
Step 1: Disassemble your Retaliator. Make sure to remove all the screws before detaching the casing.


Step 2: Take out the bolt sled assembly. Disassemble the plunger mechanism components and remove the plunger casing from the bolt system.


This is what the bolt looks like with the air restrictors still intact.


Step 3: Use a long screwdriver and a hammer, carefully knock out the air restrictor assembly though the back of the bolt.


You can also use other tools (ie. power drills) to remove the air restrictors too. Just be careful not to damage the bolt in the process.

This is what the bolt looks like with the air restrictors removed.


At this point in the process, you will probably notice that a leftover part of the air restrictor (the 3 pronged piece) is still inside the bolt, and it will tend to rattle loosely back and forth. Simply apply a drop of glue inside the rear section of the bolt and let that loose piece adhere to the back so that it doesn't move anymore.


:: Spring Replacement ::

One of the ways to increase the speed of air delivery through the bolt is to replace the stock spring with a stronger aftermarket spring.

There are many different springs with different sizes and spring force ratings. Spring choice will depend on your usage.

This example below shows a stock spring (top photo) vs. an aftermarket 8kg load spring (bottom photo).


Notice that the stronger aftermarket spring i use is made shorter than the stock spring, this is because the spring wire is thicker, hence it takes up more space when compressed.

The reduction in spring length allows the plunger system to accommodate the extra space required by the aftermarket spring (or else the plunger will not be able to catch properly).

Note that when using shorter aftermarket springs, the bolt lock should also be removed to ensure that the bolt does not get stuck during usage (see below for more information on bolt lock removal).

Here is what they look like installed within the plunger system.


Note that in this plunger design, the spring has to be kept within the catch system dimensions to work.


:: Special Notes ::

Generally for blasters with air restrictors removed, padding is usually recommended to be installed on the plunger. This is because without the AR, there is no air buffering system to cushion the plunger on bolt impact.

But in the Retaliator plunger system, the plunger itself features a narrowed internal area at the front section, this creates a sort of "buffer" effect and prevents the plunger from striking the bolt.


During modding tests, it turns out that plunger padding wasn't necessary in this blaster. Even without any plunger padding, when the blaster was fired, there was only a muffled impact sound (instead of the loud cracking noise common in previous blaster designs).

In addition, the stock o-ring  already has an excellent seal, so there was no need to replace it. Note that if the plunger seal is too tight, it may create excessive resistance and slow down the plunger, resulting in noticeably reduced performance.


:: Locks Removal ::

Remove the bolt and trigger locks. This is an optional modding step, but it is highly recommended (especially in blasters with air restrictors removed and using shorter aftermarket springs).


With the locks removed, it allows users to be able to release a primed blaster in a controlled manner. This is more convenient than having to fire an extra shot just to de-prime the blaster and helps prevent dry firing.

The user can simply push back the bolt anytime, pull the trigger to release the catch, then ease the plunger forward under support with the priming grip.

In addition, as mentioned earlier, the bolt lock removal mod is also required when using shorter aftermarket springs, to ensure that the bolt does not get stuck during usage.

Important Note: With the bolt and trigger locks removed, users have to ensure that the bolt sled is pushed all the way forward before firing (do not fire when the breech is partially or fully open).

For additional reference, here is the bolt lock removal procedure for the Nerf Rampage (photo shows the left side of the Rampage casing):


:: Final Step ::

Assemble everything back together and its all done!


:: Modified Nerf N-Strike Elite Retaliator - Range Test Video ::


:: Sample Test Fire Data ::

PTG: Parallel-To-Ground (Shoulder height, no elevation)
ATG: Angled-To-Ground (Aimed higher, 30 degrees elevation)

Distance is measured at where the dart lands (Average of 6 darts).

Stock Elite Retaliator
Ammo: Elite foam darts
PTG = 45-55ft
ATG = 65-75ft

Modified Elite Retaliator (AR Removed Only)
Ammo: Customized foam darts + 1.0 gram soft silicone tip weight
PTG = 55-65ft
ATG = 75-85ft

Modified Elite Retaliator (AR Removed + 8kg Load Spring)
Ammo: Customized foam darts + 1.0 gram soft silicone tip weight
PTG = 70-80ft
ATG = 90-100ft

Note that Elite foam darts can achieve similar ranges too, but their overall performance and accuracy tend to be rather erratic when used in modded blasters (ie. they still curve and swerve in flight), so their results are less consistent.

The tests were done under controlled conditions and the results are sample estimates for reference (your results may differ depending on materials and mod techniques used).


:: Additional Notes ::

For modding reference, i've also tested the brass breech mod on one of my other Retaliator units and its ranges improved further by another 10-15ft. 

Note that although an improved breech system with 100% air seal does help increase power efficiency and range, the overall performance improvements are still based on their existing plunger air volumes (compared to larger direct plunger blasters like Longshots or Stampedes).


Friday, July 27, 2012

Nerf N-Strike Elite Rampage - Internals Guide!

This guide will serve as a reference for the internals of the Nerf N-Strike Elite Rampage.

For a detailed review of the Nerf Elite Rampage, click Here.

Nerf N-Strike Elite Rampage - Disassembled


Nerf N-Strike Elite Rampage - System Internals


Nerf N-Strike Elite Rampage - Direct Plunger Internals


Nerf N-Strike Elite Rampage - Direct Plunger Parts


Thursday, July 26, 2012

Nerf N-Strike Elite Retaliator - Internals Guide!

This guide will serve as a reference for the internals of the Nerf N-Strike Elite Retaliator.

For a detailed review of the Nerf Elite Retaliator, click Here.

Nerf N-Strike Elite Retaliator - Disassembled


Nerf N-Strike Elite Retaliator - Direct Plunger Internals


Nerf N-Strike Elite Retaliator - Direct Plunger Parts


Tuesday, July 24, 2012

Elite Foam Darts - Comparison & Internals Guide!

This guide will look at the differences between the new Elite foam darts and the older Streamline foam darts.

Weight comparison between both foam darts:


The Elite foam dart is noticeably lighter at 1.0 grams, while the Streamline foam dart weighs in at a heavier 1.3 grams.

Here is a cross-section comparison of both foam darts:


The Elite foam darts have a much shorter tip stem, which is lighter and shifts the tip weight further forward within the foam dart. This helps it to achieve better balance and improved range.

Friday, July 20, 2012

Xpower Stampede Kit - Review & Installation Guide!

Check out the Xpower Stampede Kit from Xplorer!

Xplorer is a company in Singapore that designs and produces ready-made aftermarket performance parts and kits for Nerf blasters.

The Xpower Stampede Kit upgrades the stock Stampede breech system to an improved breech design that enables more efficient air flow from the plunger to the barrel, hence generating more power and longer ranges.

The parts in this kit are individually CNC machined from a multi-axis milling machine and further hand finished to ensure high quality and fitment.

:: Overview ::

This kit comprises of just 2 main parts, the Xpower receiver piece (with attached copper barrel) and the Xpower bolt tip piece.


The included copper barrel is 12cm (approx 4.7") in length and designed specifically to fit stefans (custom foam darts), the dart fit is similar to 9/16" K&S brass barrels or 0.528" ID PETG barrels.

The Xpower system works by utilizing a funnel design in the receiver. When chambering a foam dart, the bolt is guided into the receiver funnel as it moves forward and pushes the foam dart securely into the barrel, then the Stampede fires and the bolt retracts back. This completes one firing cycle.

In the photo below, you can see the funnel design in the Xpower receiver.


In order to connect into the funneled receiver, a matching Xpower bolt tip piece will be installed on the existing bolt to enable this system to work.


Note that the Xpower Stampede breech is designed for short-length stefans (up to 3.5cm length), this is to ensure high performance, consistency and accuracy.

This kit is designed to be very simple to install and can be done by anyone with basic modding skills.


:: Installation Guide ::

For the system to work optimally, ensure that the Stampede is already modded with the various basic AR removal, aftermarket spring and voltage increase mods beforehand, as shown in my Nerf Stampede Mod Guide.


Proceed to remove all the original parts and mechanisms from the front of the blaster.


Step 1: Start with the receiver section.

Slot the Xpower receiver and copper barrel into the original orange plastic barrel, use some electrical or duct tape to wrap a few ring layers around the copper barrel so that it sits properly within it. Install the 3 machine screws to secure it to the casing.


The receiver section is done!


Step 2: On to the bolt section.

Take the original orange plastic bolt and draw guide lines across the front part of the bolt tip, note where the dotted guide lines are drawn in the photo below.


Also draw a guide line at the top of the bolt to indicate the bolt tip alignment.


Use a Dremel with a cutting wheel and sanding bit (or other suitable cutting tool) to cut the bolt tip at the guide lines. Make sure the cut is clean and sanded smooth.


Glue the Xpower bolt tip to the original bolt. Ensure that it is aligned accurately. Use high strength glue to ensure a durable bond.


The bolt section is done!


Step 3: Install all the parts into the Stampede.

Test the bolt movement to ensure that the Xpower bolt tip chambers into the Xpower receiver smoothly and is also able to retract back automatically on its own without resistance.


After everything is assembled. This is what the Xpower Stampede breech will look like.


The Xpower Stampede Kit works with both the Xpower 12-dart Stefan Clips (Version 2 Only) and Converted N-Strike 18-dart Stefan Clips.


:: Demo & Test Fire ::

In this demo & test fire of the installed Xpower Stampede Kit, i am using a combination of 9kg load spring with 16.8V power:


Note that the Stampede's range and rate-of-fire will vary depending on the spring load and power source/voltage. Users can customize it to their own preference.


:: Comparison Tests & Modding Tips ::

Many modders have been asking about the difference between the Brass breech and Xpower breech for the Stampede.

Here is a comparison test video that demonstrates the performance difference between both breech designs, based on equivalent spring loads and optimization mods done:


Note that this comparison test is not meant to establish which design is better, its just a process to understand their differences and how to optimize them. There are pros and cons to both designs (beyond just range distance), so its up to users to determine the most suitable design for their usage.

The variation in their ranges are due to the characteristics of their different breech designs.

The brass breech design is more complex and requires skill to build and tune but when built well it features a full air seal, while the funnel design of the Xpower breech is simpler and much easier to install, but sometimes there may still be tiny gaps in the seal, hence resulting in slightly shorter ranges at equivalent spring loads (each setup is different due to parts variations, so it may just need further fine-tuning to get a full air seal).


:: Summary ::

Overall, the Xpower Stampede kit is an ideal aftermarket performance enhancement for modders who are looking for high quality ready-made parts. It saves alot of modding time and requires minimal installation work.

For non-modders, this kit grants instant improvement to their blasters without the need to spend hours modding and tuning. Xplorer also offers their customers installation services for the blaster kits too (subject to their technical staff manpower availability).

With the right spring load and setup, the Xplorer Stampede kit offers users excellent modded performance and greatly enhances the effectiveness of their Stampedes. :)


To order the Xpower Stampede Kit: Xplorer Web Store

To participate in Xpower discussions: Xplorer Facebook Group