Pages

Tuesday, September 29, 2009

Nerf Raider Mod Guide!

This Mod Guide will cover popular mods for the Nerf Raider.

Mods covered:
- Air Restrictor (AR) Removal
- Plunger Padding
- Spring Replacement

Note: These mods are also applicable to the Nerf Recon as it shares similar internal mechanisms as the Nerf Raider (some of the info here may also be repeated at the Nerf Recon Mod Guide).

>> Nerf Recon Mod Guide
>> Nerf Longshot Mod Guide

Disclaimer: Modify at your own risk. Modifications may wear out or damage your blaster. Please be careful when using hobby tools!


:: AR Removal ::

Step 1: Disassemble your Raider. Make sure to remove all the screws before detaching the casing. There are 14 screws in the main body, 5 screws in the front grip and 2 larger screws in the grey plunger cap.


Step 2: Detach the bolt, plunger and bolt sled. Unscrew the top plunger guide rail for easier access.
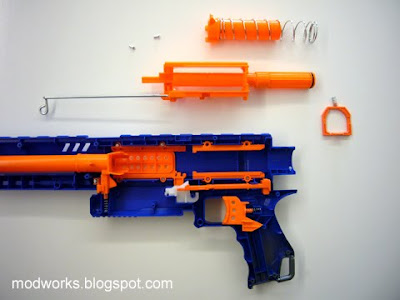


Step 3: Knock out the metal retaining pin that holds the bolt and bolt sled, this will separate the bolt from the bolt sled.


Step 4: This is the "Pipe Cutter" method. You will need a rotational pipe cutter to cut the bolt in order to remove the AR.

Please observe closely the spot where the pipe cutter blade is positioned at. That is the correct position to cut (though you can deviate 1mm either way). Just tighten the pipe cutter slightly and do the rotational cut (not too much or else it might slice the bolt in half).

In the following photo, a pre-sliced cut has already been made for reference.


Rotate the pipe cutter 2-3 times, and try to pull apart the bolt. If it doesn't move, rotate the pipe cutter again, do not over-tighten the pipe cutter! Keep testing. Very soon, the bolt will separate into two parts and the AR will just drop out.


Step 5: Join back the 2 sections of the bolt sleeve using plastic hobby or epoxy glue. Let the glue set properly before re-installing back into the blaster.


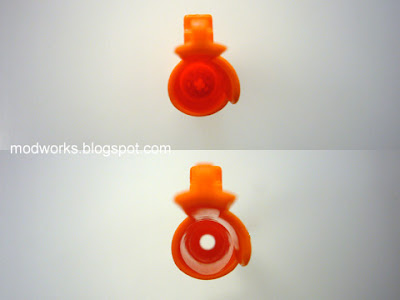
Before AR removal (top photo) & After AR removal (bottom photo).


:: Plunger Padding ::

Without the AR, there is no air buffering system to cushion the plunger on bolt impact.

This results in very high wear and tear on the plunger, by both normal firing and dry firing. Due to repeated direct impact on the bolt (hence the loud cracking sound during firing), many users of modded Raiders have experienced bolts eventually punching a hole out of the back of the plungers!

Therefore, padding should be applied to the plunger to help cushion the impact.

In the following photo, soft rubber padding is attached to the base of the plunger.


The 20mm diameter soft rubber pads i used in the above example are from a brand called "Volkmar-Fix", they can be found at most common hardware shops.


Make sure to only use soft rubber pads that are easy to compress, so that it can allow the bolt to move backwards fully for proper loading/unloading of magazines and chambering of darts.

Experiment with various plunger padding methods to help maintain the durability of AR removed blasters over long-term usage.


:: Spring Replacement ::

One way to increase the speed of air delivery through the bolt is to replace the stock spring with a stronger aftermarket spring.

There are many different springs with different sizes and spring force ratings. Springs can be sourced from your local spring supply shops. Spring choice will depend on your usage.

This example below shows a stock spring (top photo) vs. an aftermarket 6kg load spring (bottom photo).


Stronger springs are usually made of thicker wires. Internal casing trimming and adjustments may need to be done so that the springs have enough space to expand when compressed, for smooth firing operation.

Stock internal casing (left photo) vs. Trimmed internal casing (right photo).


Depending on the strength of the spring used, extra catch springs may also need to be added to hold the increased tension.

Note that a stronger spring will require more effort to prime the blaster before each shot, and the impact of the plunger on the bolt and overall stress on the blaster casing is also much greater. It'll be important to account for these factors when doing a spring replacement.


:: Sample Test Fire Data ::

PTG: Parallel-To-Ground (Shoulder height, no elevation)
ATG: Angled-To-Ground (Aimed higher, 30 degrees elevation)

Distance is measured at where the dart lands (Average of 6 darts).

Stock Raider
PTG = 20 ft
ATG = 30 ft

Modded Raider (AR Removal & 6kg Load Aftermarket Spring)
PTG = 50 ft
ATG = 60 ft

Note that the test was done indoors with customized foam darts. The results are sample estimates for reference (your results may differ depending on materials and mod techniques used).

Monday, September 28, 2009

Nerf Longshot Mod Guide!

This Mod Guide will cover popular mods for the Nerf Longshot.

Mods covered:
- Air Restrictor (AR) Removal
- Air Release Seal
- Plunger Padding
- Aftermarket Spring Replacement
- Deadspace Elimination
- Charging Handle Easy Release

Note: Some of the info here may also be repeated at the other Mod Guides.

>> Nerf Recon Mod Guide
>> Nerf Raider Mod Guide

Disclaimer: Modify at your own risk. Modifications may wear out or damage your blaster. Please be careful when using hobby tools!


:: AR Removal ::

Step 1: Disassemble your Longshot. Make sure to remove all the screws before detaching the casing. There are 21 screws in the main body and 7 screws in the shoulder stock.


Step 2: Take out the bolt sled assembly. Knock out the metal retaining pin that holds the bolt and bolt sled, this will separate the bolt from the bolt sled.


Step 3: Remove the plunger and just focus on the bolt assembly.

The bolt will still be inside the plunger casing (my example photo just shows a seperate bolt for clearer reference, don't remove it from the plunger casing).

Take a straight wire cutter and snap off the 3 plastic supports holding the AR structure.


Once the 3 supports are cut, the AR components will just drop out.

Here is what the bolt will look like with AR (top photo) and without AR (bottom photo).


:: Air Release Seal ::


For maximum air flow, cover the Longshot bolt's air release. You can use tape or just fill it with epoxy glue.


:: Plunger Padding ::


Without the AR, there is no air buffering system to cushion the plunger on bolt impact.

This results in very high wear and tear on the plunger and bolt casing, by both normal firing and dry firing. Due to repeated direct impact on the bolt (hence the loud cracking sound during firing). In time, the bolt and plunger may become damaged.

Therefore, padding should be applied to the plunger to help cushion the impact.

In the following photo, i simply attached custom shaped soft foam bumper padding to the base of the plunger. You can try using other cushioning materials too, just make sure the padding can compress well and covers up to the edges of the plunger base.


Note that the bolt clearance in the Longshot bolt casing is quite limited, therefore it is recommended to trim the padding thinner so that it does not interfere with the bolt travel when loading/unloading clips.


:: Aftermarket Spring Replacement ::

One way to increase the speed of air delivery through the bolt is to replace the stock spring with a stronger aftermarket spring.

There are many different springs with different sizes and spring force ratings. Springs can be sourced from your local spring supply shops. Spring choice will depend on your usage.

The examples below show a stock spring (top photo) vs. an aftermarket spring (middle photo) vs. a stock spring with aftermarket spring (bottom photo).


Stronger springs are usually made of thicker wires. Adjustments may have to be done as required for smooth firing operation.

Depending on the strength of the spring used, extra catch springs may also need to be added to hold the increased tension.

Note that a stronger spring will require more effort to prime the blaster for each shot, and the impact of the plunger on the bolt and overall stress on the blaster casing is also much greater. It'll be important to account for these factors when doing a spring replacement.


:: Deadspace Elimination ::

There is a volume of empty space within the plunger casing. For more efficient air flow, it is recommended to fill up that space to eliminate the deadspace. In this example, i use foam material shaped to fill that space.


:: Priming Handle Easy Release ::

Trim the Longshot priming handle internal catch so that it'll be easy to attach and detach it anytime for blaster maintenance and future mods.


:: Sample Test Fire Data ::


PTG: Parallel-To-Ground (Shoulder height, no elevation)
ATG: Angled-To-Ground (Aimed higher, 30 degrees elevation)

Distance is measured at where the dart lands (Average of 6 darts).

Stock Longshot
PTG = 25 ft
ATG = 35 ft

Modded Longshot (AR Removal & 14kg Load Aftermarket Spring)
PTG = 70 ft
ATG = 90 ft

Note that the test was done indoors with customized foam darts. The results are sample estimates for reference (your results may differ depending on materials and mod techniques used).

Sunday, September 27, 2009

Nerf Recon Mod Guide!

This Mod Guide will cover popular mods for the Nerf Recon.

Mods covered:
- Air Restrictor (AR) Removal
- Plunger Padding
- Spring Replacement

Note: These mods are also applicable to the Nerf Raider as it shares similar internal mechanisms as the Nerf Recon (some of the info here may also be repeated at the Nerf Raider Mod Guide).

>> Nerf Longshot Mod Guide
>> Nerf Raider Mod Guide

Disclaimer: Modify at your own risk. Modifications may wear out or damage your blaster. Please be careful when using hobby tools!


:: AR Removal ::

Step 1: Disassemble your Recon. Make sure to remove all the screws before detaching the casing. There are 12 screws in the main body and 2 screws in the black plunger cap.


Step 2: Take out the bolt sled assembly. Knock out the metal retaining pin that holds the bolt and bolt sled, this will separate the bolt from the bolt sled.


Step 3: This is the "Pipe Cutter" method. You will need a rotational pipe cutter to cut the bolt in order to remove the AR.

Please observe closely the spot where the pipe cutter blade is positioned at. That is the correct position to cut (though you can deviate 1mm either way). Just tighten the pipe cutter slightly and do the rotational cut (not too much or else it might slice the bolt in half).

In the following photo, a pre-sliced cut has already been made for reference.


Rotate the pipe cutter 2-3 times, and try to pull apart the bolt. If it doesn't move, rotate the pipe cutter again, do not over-tighten the pipe cutter! Keep testing. Very soon, the bolt will separate into two parts and the AR will just drop out.


Step 4: Join back the 2 sections of the bolt sleeve using plastic hobby or epoxy glue. Let the glue set properly before re-installing back into the blaster.


:: Plunger Padding ::

Without the AR, there is no air buffering system to cushion the plunger on bolt impact.

This results in very high wear and tear on the plunger, by both normal firing and dry firing. Due to repeated direct impact on the bolt (hence the loud cracking sound during firing), many users of modded Recons have experienced bolts eventually punching a hole out of the back of the plungers!

Therefore, padding should be applied to the plunger to help cushion the impact.

In the following photo, soft rubber padding is attached to the base of the plunger.


The 20mm diameter soft rubber/foam pads i used in the above example are from a brand called "Volkmar-Fix", they can be found at most common hardware shops.


Make sure to only use soft rubber pads that are easy to compress, so that it can allow the bolt to move backwards fully for proper loading/unloading of magazines and chambering of darts.

Experiment with various plunger padding methods to help maintain the durability of AR removed blasters over long-term usage.


:: Spring Replacement ::

One way to increase the speed of air delivery through the bolt is to replace the stock spring with a stronger aftermarket spring.

There are many different springs with different sizes and spring force ratings. Springs can be sourced from your local spring supply shops. Spring choice will depend on your usage.

This example below shows a stock spring (top photo) vs. an aftermarket 6kg load spring (bottom photo).


Stronger springs are usually made of thicker wires. Adjustments may have to be done as required for smooth firing operation.

Depending on the strength of the spring used, extra catch springs may also need to be added to hold the increased tension.

Note that a stronger spring will require more effort to prime the blaster before each shot, and the impact of the plunger on the bolt and overall stress on the blaster casing is also much greater. It'll be important to account for these factors when doing a spring replacement.


:: Sample Test Fire Data ::

PTG: Parallel-To-Ground (Shoulder height, no elevation)
ATG: Angled-To-Ground (Aimed higher, 30 degrees elevation)

Distance is measured at where the dart lands (Average of 6 darts).

Stock Recon
PTG = 20 ft
ATG = 30 ft

Modded Recon (AR Removal & 6kg Load Aftermarket Spring)
PTG = 50 ft
ATG = 60 ft

Note that the test was done indoors with customized foam darts. The results are sample estimates for reference (your results may differ depending on materials and mod techniques used).