So you have got your new Elite clips, filled them with ammo and loaded them into your blasters. Ready for Nerf games!
But wait! Notice the clear part of the clip is facing the right side?
Its fine for left-handed users... but for right-handed users it means they cannot see how much ammo is in the clip, instead all their opponents can see the ammo count clearly!
Here is an example of the Elite 18-dart clip in a Longshot:
Right-handed users cannot see their ammo count...
...but their opponents can see it clearly!
Studies suggest that up to 80-90% of the world population is
right-handed, which means alot of users (like me!) will have this common issue with their
Elite clips.
So here is how to solve it, with some simple modding steps.
Step 1:
Cut or sand down the raised clip restriction areas at the top part of the clip.
Original clip (left) vs modded clip (right).
Make sure the raised areas are flattened and smooth.
Step 2:
Use a dremel or hobby knife to cut a clip-lock notch on the side of the clip. Mirror the exact notch position from the other side.
Ensure that the new clip-lock notch is cut at the correct position.
Final Step:
Clean up the notch cuts and test load it into blasters. Its done!
Original Elite 18-dart clip (left) vs Modded Elite 18-dart clip (right).
:: Results ::
Here is the modded Elite 18-dart clip loaded into a Longshot.
Right-handed users can now see their ammo count...
...but their opponents cannot! :)
Enjoy your improved Elite Clips!
Note: This mod can be done on any N-Strike clips or drum magazines too.
--
Additional Note:
For blasters like the Nerf Retaliator or Recon, the modded clips will get blocked by the casing part in front of the clip well (as shown below).
Therefore you'll need to also cut off the raised section on the clip, then it can fit into those particular blasters.
- Update! -
For blasters like the Nerf Stampede or Rayven, their clip detection pressure switches are in a position that will be affected by the unused notch, hence the system will "think" that there is no clip loaded. (Thanks to harpuia for this tip!)
Therefore modders will have to either tape down or bypass those pressure switches, or just use tape to seal the unused notch.
Showing posts with label Clip. Show all posts
Saturday, August 4, 2012
Thursday, November 17, 2011
Stefan Compatible 18-Dart Clip - Mod Guide!
Most modders who custom make their own foam darts for better accuracy and range use shorter length foam darts which are commonly referred to as "stefans".
The stock N-Strike clip design isn't compatible with shorter length foam darts, as they tend to shift back and forth within the excess space during usage which causes jams (especially in longer clips), so modifications have to be done on the clips to fit them properly.
I've been using stefan compatible clips of various designs for quite a while, but the simplest and most effective design that i've tried out so far is the "guide rod" design.
The "guide rod" design is based on the clip modding technique by JustSomeBob at the NerfRevolution forum and WicketTheModder at the NerfHaven forum.
It is basically a rod that runs the length of the clip and nests within a collar in a hole drilled in the clip's spring loaded dart pusher, this rod keeps the stefans in position throughout. The dart pusher is constantly guided by the rod as it advances the stefans up into the bolt.
In addition, i also make a "slot window" on my modded clips, so that i can view the ammo count too.
Lets start...
Step 1:
The materials i used for this clip mod are as follows.
- 18-dart clip
- 5mm OD K&S brass tube (for the guide rod)
- 6mm OD K&S brass tube (for the guide collar)
- Dremel 767-01
- Selleys super strong 2-part epoxy glue

You can substitute the materials and tools with other similar items, just adapt them to your requirements.
Step 2:
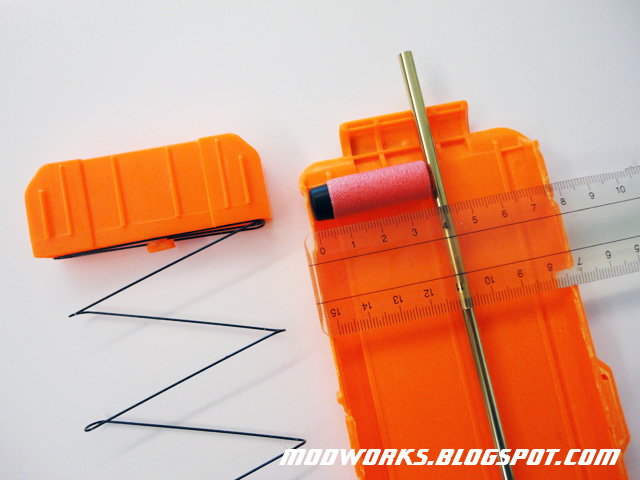
Open up the 18-dart clip casing. As the 18-dart clip casing is usually glued together, use a Dremel to cut along the side of the clip casing. Make sure the cuts are straight and even.

Remember to remove the 2 black machine screws at the bottom of the clip and detach the rubber feet too.
Step 3:
Measure the position of the guide rod based on the length of your stefans.

Step 4:
Mark the measured point on the clip's dart pusher, then drill a hole in it to fit the guide collar.

Step 5:
For the guide rod, cut a 26cm length of 5mm OD brass tube.
For the guide collar, cut a 3cm length of 6mm OD brass tube.

The 5mm OD guide rod will nest inside the 6mm OD guide collar.
Step 6:
Glue the 3cm length of 6mm OD guide collar into the drilled hole in the dart pusher.

Step 7:
Glue the 26cm length of 5mm OD guide rod onto the bottom of the clip casing, make sure it is nested inside and aligned with the guide collar too.

Step 8:
This is what the completed clip internals will look like.

Test and ensure that the dart pusher is able to move upwards and downwards smoothly.
Step 9:
Create a slot window to view the ammo count.
Use a Dremel to cut out a strip of plastic along the clip casing.

Step 10:
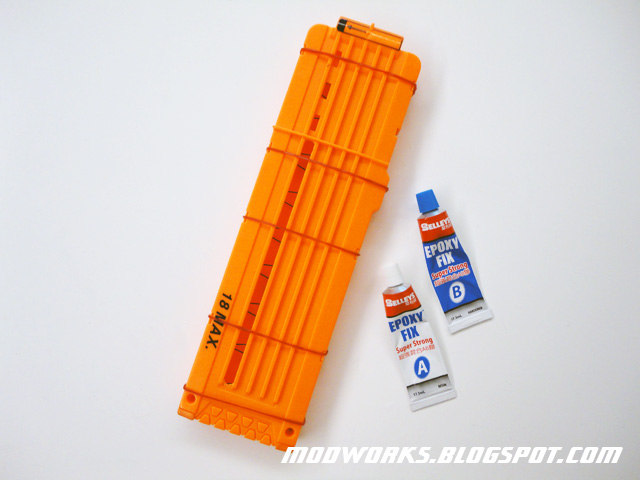
Once everything is ready, re-assemble the clip with epoxy glue (use rubber bands to clamp the casing securely during curing).

Step 11:
Its done!

Check the ammo count by viewing the slot window. :)
--
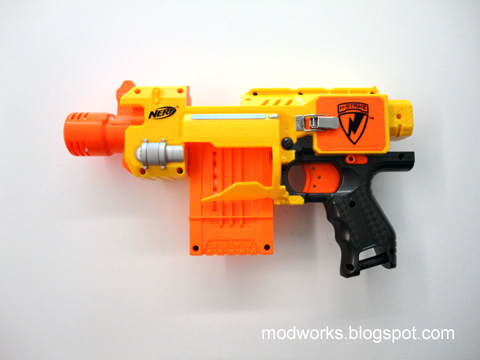
Loaded in a modded minimized Stampede.

Loaded in a modded brass breeched + shotgun gripped Longshot.

>> Update!
There is now a simpler method posted up by hanzo at the NerfSG Forum, and it doesn't require the clip to be opened up.
Check out his guide in this link:
http://nerfsg.freeforums.org/18-dart-clip-stefan-mod-another-version-t3522.html
The stock N-Strike clip design isn't compatible with shorter length foam darts, as they tend to shift back and forth within the excess space during usage which causes jams (especially in longer clips), so modifications have to be done on the clips to fit them properly.
I've been using stefan compatible clips of various designs for quite a while, but the simplest and most effective design that i've tried out so far is the "guide rod" design.
The "guide rod" design is based on the clip modding technique by JustSomeBob at the NerfRevolution forum and WicketTheModder at the NerfHaven forum.
It is basically a rod that runs the length of the clip and nests within a collar in a hole drilled in the clip's spring loaded dart pusher, this rod keeps the stefans in position throughout. The dart pusher is constantly guided by the rod as it advances the stefans up into the bolt.
In addition, i also make a "slot window" on my modded clips, so that i can view the ammo count too.
Lets start...
Step 1:
The materials i used for this clip mod are as follows.
- 18-dart clip
- 5mm OD K&S brass tube (for the guide rod)
- 6mm OD K&S brass tube (for the guide collar)
- Dremel 767-01
- Selleys super strong 2-part epoxy glue
You can substitute the materials and tools with other similar items, just adapt them to your requirements.
Step 2:
Open up the 18-dart clip casing. As the 18-dart clip casing is usually glued together, use a Dremel to cut along the side of the clip casing. Make sure the cuts are straight and even.
Remember to remove the 2 black machine screws at the bottom of the clip and detach the rubber feet too.
Step 3:
Measure the position of the guide rod based on the length of your stefans.
Step 4:
Mark the measured point on the clip's dart pusher, then drill a hole in it to fit the guide collar.
Step 5:
For the guide rod, cut a 26cm length of 5mm OD brass tube.
For the guide collar, cut a 3cm length of 6mm OD brass tube.
The 5mm OD guide rod will nest inside the 6mm OD guide collar.
Step 6:
Glue the 3cm length of 6mm OD guide collar into the drilled hole in the dart pusher.
Step 7:
Glue the 26cm length of 5mm OD guide rod onto the bottom of the clip casing, make sure it is nested inside and aligned with the guide collar too.
Step 8:
This is what the completed clip internals will look like.
Test and ensure that the dart pusher is able to move upwards and downwards smoothly.
Step 9:
Create a slot window to view the ammo count.
Use a Dremel to cut out a strip of plastic along the clip casing.
Step 10:
Once everything is ready, re-assemble the clip with epoxy glue (use rubber bands to clamp the casing securely during curing).
Step 11:
Its done!
Check the ammo count by viewing the slot window. :)
--
Loaded in a modded minimized Stampede.
Loaded in a modded brass breeched + shotgun gripped Longshot.
>> Update!
There is now a simpler method posted up by hanzo at the NerfSG Forum, and it doesn't require the clip to be opened up.
Check out his guide in this link:
http://nerfsg.freeforums.org/18-dart-clip-stefan-mod-another-version-t3522.html
Saturday, December 4, 2010
Nerf Barricade "Clip Conversion" Mod Guide!
What if the Nerf Barricade could use N-Strike clips and mags?
This blaster modification project is a joint development between SgNerf and pSyK (very cool Nerf enthusiast and modder at the NerfSG forum), without him this project would still be on the drawing boards.
I initially started on the project with an early prototype but pSyK was the one who developed the final design and functionality for this Barricade clip conversion mod.
Full credit goes to pSyK for his excellent design and implementation!
Introducing... the Nerf Barricade ECS!

Before the conversion is done, the Barricades are all modded with:
- Voltage Increase
- Trigger Activated Power On
- Flywheel Adjustment
Click this link for more information on the various performance mods: Nerf Barricade Mod Guide
Okay, here is how its converted...
- Nerf Barricade Clip Conversion Process -
Step 1:
Remove the original 10-dart turret and cut a channel at the bottom of the casing, make sure the gap is wide enough to allow a N-Strike clip to fit through properly. Cut away the turret advancement stalk too.

Step 2:
We will now create the clip securing system.
Trim off the turret advancement stem part way, this will now act as part of the clip positioning design.
In my example, i installed machine screws at positions which correspond to the clip notches and dimensions, these will be the parts that will hold the clip securely in the blaster and position it in the correct alignment.

Other materials like rubber padding or plastic bolts can also be used to create the clip securing system, just experiment and try out various methods to develop other types of clip securing system designs.
Step 3:
Trim and shape part of the casing as shown in the photo below, this will also form part of the clip securing system.

Note that this particular casing part will correspond to the shape of a notch in the front of the 6-dart clip and 18/35-dart drum mags, the 18-dart clip will need just a slight trim on it's front section to match the same notch as the rest.
Step 4:
Remove the trigger lock (found behind the trigger mechanism), this will allow the trigger to be able to be half pulled without getting stuck.
For convenience, also remove the access hatch door and lock mechanism. If you have a soldering iron, you can also remove the pressure switch and re-solder the wires back together (then you'll now have a spare pressure switch to use in other projects).

Step 5:
Add some padding on the dart pusher stem to extend its travel, this will help it to push the foam darts further into the flywheels for better contact.
Make sure the dart pusher travel is neither too long or too short, it must be just right. Keep testing until it achieves a perfect positioning.
The amount of extension padding will depend on each particular Barricade unit as individual units may differ slightly in parts fit.

Step 6:
With the clip conversion done, the dart pusher stem will need to retract much faster so that the next foam dart can advance up the clip to be ready for firing. If the dart pusher stem is too slow to retract, jams will occur.
The solution is to increase the load on the dart pusher stem's retraction spring.
Simply pull the spring back halfway and bolt it down.

Step 7:
Load in a clip and test that all the parts and components are aligned properly.
Make sure the flywheels can spin freely without obstruction. Ensure that the foam darts can be pushed forward and propelled consistently by the flywheels.

Step 8:
Assemble everything together and start running your firing tests.
Make any necessary adjustment required to achieve consistent and reliable firing performance.

Final Step:
Ditch the turrets... grab your clips and mags.
The era of clip-fed semi-auto Nerf sidearms is finally here!


Note:
- The 18-dart drum mag can also be used with this clip conversion.
- The 35-dart drum mag tends to be abit too heavy for this current conversion design, it'll need to be additionally supported when in use.
Update!
- "moddersunited" at the HvZ Forums has found another alternative method to secure the clips, check out his mod via this Link.
Nerf Barricade "Clip Conversion" - Demo & Test Fire Video!
This blaster modification project is a joint development between SgNerf and pSyK (very cool Nerf enthusiast and modder at the NerfSG forum), without him this project would still be on the drawing boards.
I initially started on the project with an early prototype but pSyK was the one who developed the final design and functionality for this Barricade clip conversion mod.
Full credit goes to pSyK for his excellent design and implementation!
Introducing... the Nerf Barricade ECS!
Before the conversion is done, the Barricades are all modded with:
- Voltage Increase
- Trigger Activated Power On
- Flywheel Adjustment
Click this link for more information on the various performance mods: Nerf Barricade Mod Guide
Okay, here is how its converted...
- Nerf Barricade Clip Conversion Process -
Step 1:
Remove the original 10-dart turret and cut a channel at the bottom of the casing, make sure the gap is wide enough to allow a N-Strike clip to fit through properly. Cut away the turret advancement stalk too.
Step 2:
We will now create the clip securing system.
Trim off the turret advancement stem part way, this will now act as part of the clip positioning design.
In my example, i installed machine screws at positions which correspond to the clip notches and dimensions, these will be the parts that will hold the clip securely in the blaster and position it in the correct alignment.
Other materials like rubber padding or plastic bolts can also be used to create the clip securing system, just experiment and try out various methods to develop other types of clip securing system designs.
Step 3:
Trim and shape part of the casing as shown in the photo below, this will also form part of the clip securing system.
Note that this particular casing part will correspond to the shape of a notch in the front of the 6-dart clip and 18/35-dart drum mags, the 18-dart clip will need just a slight trim on it's front section to match the same notch as the rest.
Step 4:
Remove the trigger lock (found behind the trigger mechanism), this will allow the trigger to be able to be half pulled without getting stuck.
For convenience, also remove the access hatch door and lock mechanism. If you have a soldering iron, you can also remove the pressure switch and re-solder the wires back together (then you'll now have a spare pressure switch to use in other projects).
Step 5:
Add some padding on the dart pusher stem to extend its travel, this will help it to push the foam darts further into the flywheels for better contact.
Make sure the dart pusher travel is neither too long or too short, it must be just right. Keep testing until it achieves a perfect positioning.
The amount of extension padding will depend on each particular Barricade unit as individual units may differ slightly in parts fit.
Step 6:
With the clip conversion done, the dart pusher stem will need to retract much faster so that the next foam dart can advance up the clip to be ready for firing. If the dart pusher stem is too slow to retract, jams will occur.
The solution is to increase the load on the dart pusher stem's retraction spring.
Simply pull the spring back halfway and bolt it down.
Step 7:
Load in a clip and test that all the parts and components are aligned properly.
Make sure the flywheels can spin freely without obstruction. Ensure that the foam darts can be pushed forward and propelled consistently by the flywheels.
Step 8:
Assemble everything together and start running your firing tests.
Make any necessary adjustment required to achieve consistent and reliable firing performance.
Final Step:
Ditch the turrets... grab your clips and mags.
The era of clip-fed semi-auto Nerf sidearms is finally here!
Note:
- The 18-dart drum mag can also be used with this clip conversion.
- The 35-dart drum mag tends to be abit too heavy for this current conversion design, it'll need to be additionally supported when in use.
Update!
- "moddersunited" at the HvZ Forums has found another alternative method to secure the clips, check out his mod via this Link.
Nerf Barricade "Clip Conversion" - Demo & Test Fire Video!
Labels:
Barricade,
Clip,
Conversion,
mod,
nerf
Subscribe to:
Posts (Atom)