Pages

Showing posts with label Buzz Bee. Show all posts

Monday, August 1, 2011

Buzz Bee Rads 12 - Internals Guide!

This guide will serve as a reference for the internals of the Buzz Bee Rads 12.

For a detailed review of the Buzz Bee Rads 12, click Here.

Buzz Bee Rads 12 - Disassembled


Buzz Bee Rads 12 - Priming & Turret Rotation Mechanisms


Buzz Bee Rads 12 - Turret Gear Mechanism


Buzz Bee Rads 12 - Plunger System


.

Friday, June 25, 2010

Buzz Bee Hunter - Internals Guide!

This guide will serve as a reference for the internals of the Buzz Bee Hunter.

For the full review of the Buzz Bee Hunter, click Here.

Buzz Bee Hunter - Disassembled


Buzz Bee Hunter - Front Internals


Buzz Bee Hunter - Back Internals


Buzz Bee Hunter - Plunger Internals

Saturday, June 19, 2010

Custom Fabricated Big Blast Aluminium Trigger - Review!

Finding that your modded Big Blast plastic triggers are constantly breaking?

Solution: Custom Fabricated Big Blast Aluminium Trigger!

These custom fabricated triggers are made from precision milled aluminium and designed for a perfect fit in the Big Blast, just swap the stock plastic trigger with it and its complete!

Buzz Bee Big Blast Aluminium Trigger - Comparison with Stock Trigger
(Top: Stock Trigger / Right: Custom Fabricated Aluminium Trigger)


Buzz Bee Big Blast Aluminium Trigger - Internal Fitment


Custom Fabricated Big Blast Aluminium Trigger - Test Fire & Fitment Video


Friday, May 1, 2009

Buzz Bee Belt Blaster Mod - Ammo Belt Drum!

The Buzz Bee Belt Blaster is an interesting foam dart blaster with its pump-action design and 30-dart ammo belt.

But the common method of connecting it into a loop and letting the belt dangle freely while firing can be abit too obstructive and looks messy, especially when playing fast paced skirmish games that involve quick fire and movement.

Therefore, i created a custom Ammo Belt Drum for the Belt Blaster, something to keep the ammo belt secured in a container yet allowing it to cycle freely (and still look cool at the same time!).

Here is how i made my custom Ammo Belt Drum:

Step 1: Get a CD Spindle Case (8cm tall) and Velcro Strips with adhesive backings.


Step 2: Cut a hatch into the CD spindle case cover, the hatch width should ideally be 4-5 cm wide. Make sure the right side of the hatch (shown in the photo below) is left attached to the cover, this will be the hatch ramp. Also cut out the CD spindle.


Step 3: Position the ammo belt in the drum (as shown below).
It should look like this.


Step 4: Stick the Velcro Strips to the Belt Blaster and Ammo Belt Drum.


Step 5
: Attach the Ammo Belt Drum to the Belt Blaster.
Note how i wrapped the Ammo Belt over the top of the Belt Blaster's belt rotator cover.


Final Step: Locked n' loaded... Ready to deploy!


Ammo Belt Drum - Test Fire Video

Thursday, April 30, 2009

Buzz Bee Tommy 20 Mod - Increase Rate-of-Fire!

As you all know, the new Buzz Bee Tommy 20 can now fire in full-auto mode! It does this via a motorised rotating drum magazine and dart pusher mechanism which automatically push foam darts forward in sequence into its 2 fly-wheels.

There are a total of 3 electric motors:
1 x Drum Rotator/Dart Pusher motor
2 x Fly-Wheel motors

As the speed of its motors are voltage dependent, increasing the voltage feed should be able to yield quicker drum magazine rotation and dart pushing, resulting in increased rate-of-fire (RoF).

In addition, the faster spinning of its fly-wheels should also "throw" the foam darts out at a higher velocity, thereby possibly increasing the firing distance.

Here is how i tested it with some simple components:

Step 1: Get the following items from an electrical supply store.
(Nerf Vulcan modders should be familiar with such items by now!)

1 x Battery Holder (holds 8 x AA Batteries)
1 x Battery Holder Snap-on Adapter
2 x Insulated Wire Leads (Red + Black w/ Crocodile Clips)


Step 2:
Attach everything together and install the AA Batteries (in this example, i used 8 x 1.5V AA Batteries which provide 12 Volt power in total). Once again, please take note of the Positive (Red) and Negative (Black) wire leads, do not let them short-circuit!


Final Step: Remove the Buzz Bee Tommy 20's battery cover and clip the Red and Black wire leads onto the connection points (clip properly and note the wire lead colours!).


Okay, time to test it out!

Here are the Test Fire Videos of my stock vs. upgraded Buzz Bee Tommy 20s:

Buzz Bee Tommy 20 RoF - Stock 4.5 Volt Power


Buzz Bee Tommy 20 RoF - Upgraded 12 Volt Power


The stock unit had a RoF of approx. 2 rounds per second, while the upgrade unit generated a RoF of approx. 3 rounds per second. Therefore there was a 50% increase in RoF.

In the upgraded unit, the foam darts also got "thrown" out of the 2 fly-wheels at a higher velocity too, with an average increased firing distance of around 6-7 feet.

If you are confident, you can try increasing the voltage further to increase the RoF and range even more, or use other power sources such as rechargable RC car li-po batteries to do the upgrade.

Just be careful not to burn out your blaster's motors! :)

An additional note for those of you looking to get into more detail in the modding of the new Tommy 20:
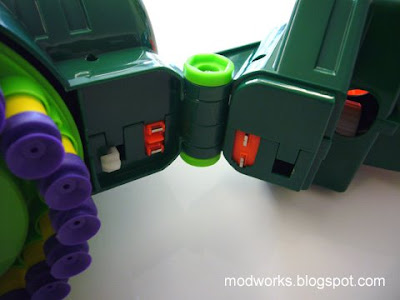

The front 2 motors powering the fly-wheels are seperated from the main body unit by a pair of electrical contacts (you can see them when you flip up the front barrel unit), therefore with additional mods, it is possible to power the drum magazine/dart pusher motor and the fly-wheel motors seperately with different power sources and voltages.

Hope we can see more mods done on the new Tommy 20! :)